In this post, you will learn about the different levels of testing for your embedded system and how you can use them to improve the testing depth of your system and its quality. Starting with software unit testing and ending with hardware system testing, we will look at the deployment scenarios and challenges. Let’s dive into the different testing levels…
Testing level 1: Unit testing
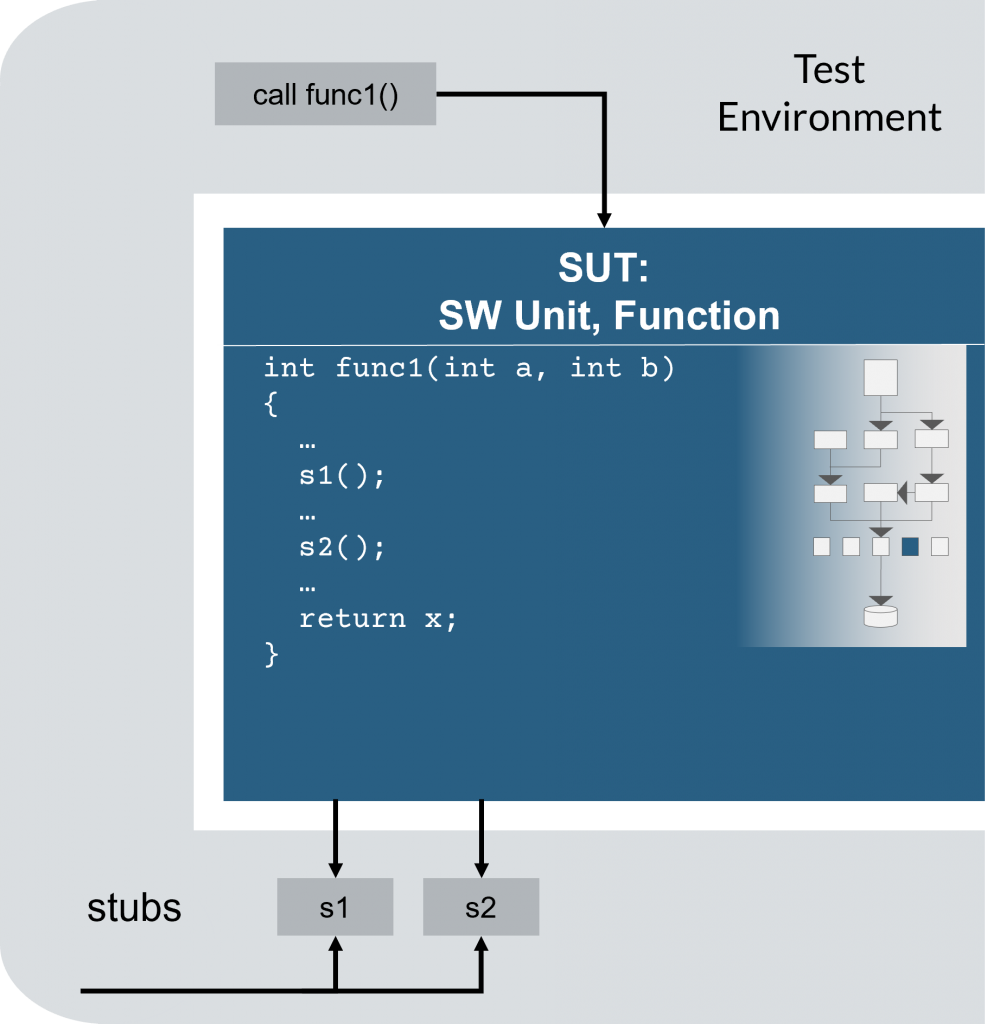
Unit Tests are used to test an atomic function. The function is called up and fully controlled by the test environment. Therefore, the test environment has to stub all the variables and functions that are used inside the Function-Under-Test. This allows the tester, typically the developer, to fully control the execution context to test all possible edge cases of the functionality. This type of testing does not include time-relevant information. Often this type of test can be automatically generated by tooling because the interfaces are well defined within the function declarations.
Characteristics:
- The execution is controlled by the test environment
- Tester is mostly the developer
Goals:
- Testing of one (“atomic”) function call
- Testing all code lines
Challenges:
- Stubbing variables and functions
Test case executed by test environment:
testcase() {
  set x = func1(in1, in2);
  check x == exp1;
}
Stubs executed by test environment:
s1() { return in3; }
s2() { return in4; }
More explanation in our video From Unit Test to System Test: 03:20 Unit Testing
Testing level 2: Unit integration testing
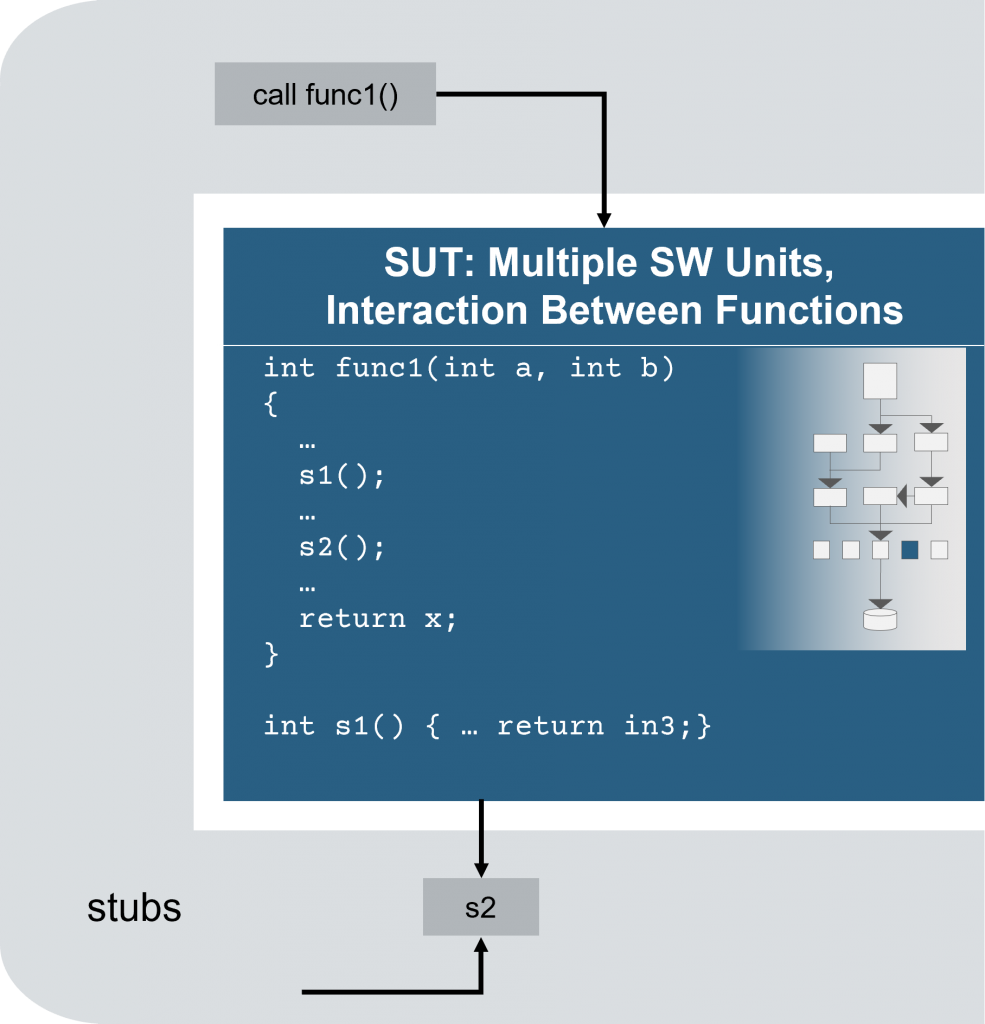
In Unit Integration Testing, a combination of atomic functions is tested in interaction. Compared to the Unit Test, it is no longer necessary to stub all functions and variables, which extends the test space. The goal is to test the interaction of functions. For example, the test environment could call function “func1”, which calls again function “s1” and returns some values. The System-Under-Test would now be function “func1” and “s1”. However, the rest of the environment is still under complete control of the test environment.
Characteristics:
- The execution is controlled by the test environment
- Tester is mostly the developer
Goals:
- Sequence of function calls
- Checks interaction between functions (“integration”)
Challenges:
- Stubbing variables and functions
- Consider possible side effects of interaction between functions
Test case executed by test environment:
testcase() {
  set x = func1(in1, in2);
  check x == exp1;
}
Stubs executed by test environment:
s2() { return in4; }More explanation in our video From Unit Test to System Test: 05:04 Unit Integration Testing
Testing level 3: Component (integration) testing
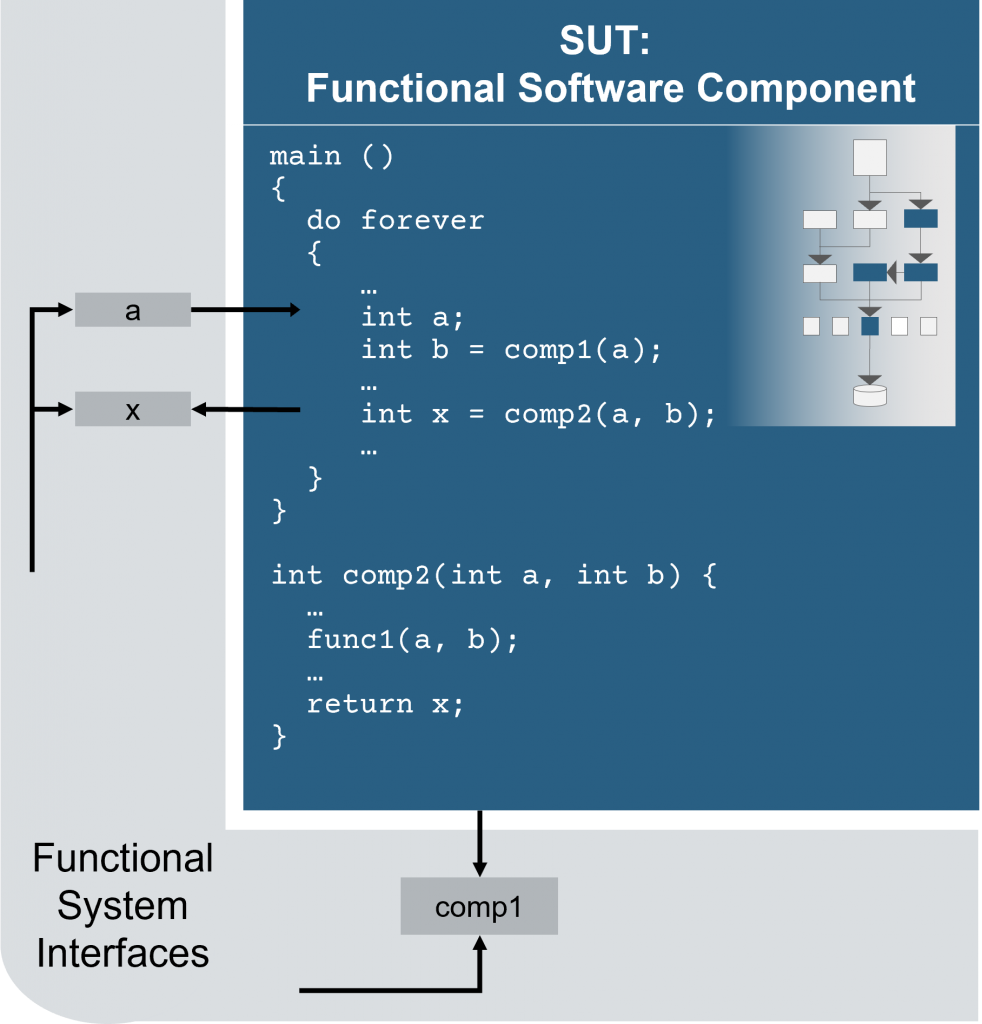
In Component (Integration) Testing, we now move the execution of the System-Under-Test (SUT) from the Test Environment to an autonomously running SUT. This means, the SUT runs autonomously and will not be ‘scheduled’ anymore by the Test Environment. It opens a wide range of new testing possibilities because now timing relevant functionalities can be tested. Component Testing focuses on testing a set of functions which could be a feature or a component. The rest of the system still has to be stubbed and modeled by the Test Environment. This can be useful, if for example the counterpart of the component to test has not been completely implemented, but you would still like to start testing your component against specific interfaces. Of course, this type of testing requires tooling that allows you to connect your free running System-Under-Test to the Test Environment and exchange data and function calls between them. This type of testing will typically be done directly by the developer or by a component or system integrator. Executing these tests already during the development – e.g., in Continuous Integration pipelines – gives the developer early feedback and helps finding bugs as early as possible.
Characteristics:
- SUT runs autonomously, not ‘scheduled’ by test environment
- Tester is the developer or the integrator
Goals:
- Test a component independent from other components
- Checks interaction between components (“integration”)
Challenges:
- Communication between SUT and test environment
- Component to test should be independent
Test case executed by test environment:
testcase() {
  set sensor_IO = in1;
  wait(500);
  check actuator_IO == exp1;
}
Functional system interfaces implemented by test environment:
var a, x;
comp1(int a) { return b; }
More explanation in our video From Unit Test to System Test: 06:32 Component Integration Testing
Testing level 4: Software system testing
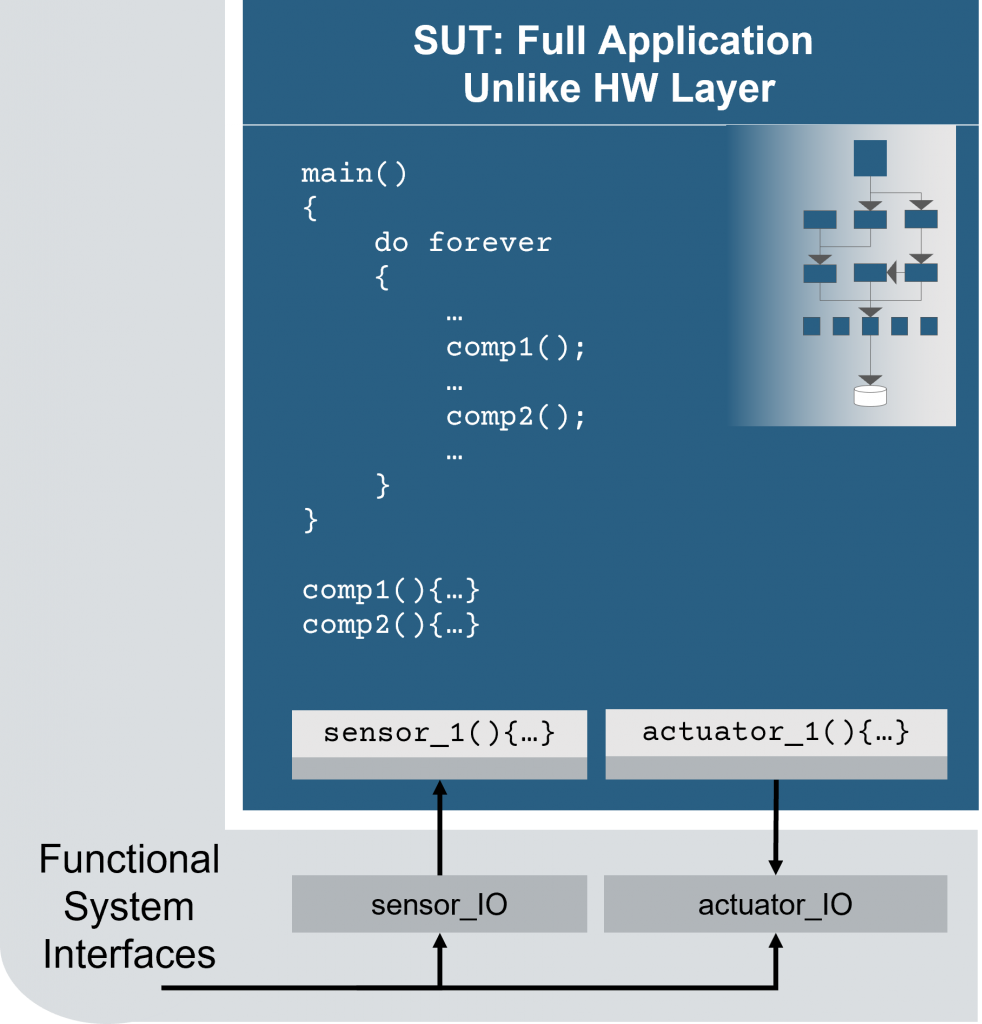
In Software System Testing, the system has been implemented and now the full functionality of the system is to be tested. The System-Under-Test can be considered as a black box, which can be stimulated and from which a certain result is expected. Before moving on to the hardware, this type of testing allows the software layer to be tested in manual tests or automated tests, e.g. during nightly builds, without the use of hardware. Additionally, the tests can be executed much faster than in real time. Therefore, the interfaces to the hardware layer must be stubbed to control, stimulate, and monitor them through the test environment. Due to the complexity of the system, the tests usually have to be written manually. The system under test runs completely autonomously and is not scheduled by the test environment.
Hint: At this point, we can add value to the next level of testing, which involves hardware. If the communication between your system and its environment is established via any protocol, it can be very helpful and time saving to design your functional system interface in the same way. This means, you abstract the hardware layer in a way that your virtualized application communicates with the same data as the hardware will do. This has the great advantage that your tests can be reused for hardware tests (see next testing level).
Characteristics:
- SUT runs autonomously, not ‘scheduled’ by test environment
- Tester is the integrator
Goals:
- Test application in a virtual environment
- Abstraction of the hardware layer
- Reuse tests for software and hardware tests
Challenges:
- Communication between SUT and test environment
- Test creation is often manual work
Test case executed by test environment:
testcase() {
  set sensor_IO = in1;
  wait(500);
  check actuator_IO == exp1;
}
Functional system interfaces implemented by test environment:
sensor_1() { return sensor_IO; }
actuator_1() { set actuator_IO;  }
More explanation in our video From Unit Test to System Test: 08:57 Software System Testing
Testing level 5: Hardware system testing
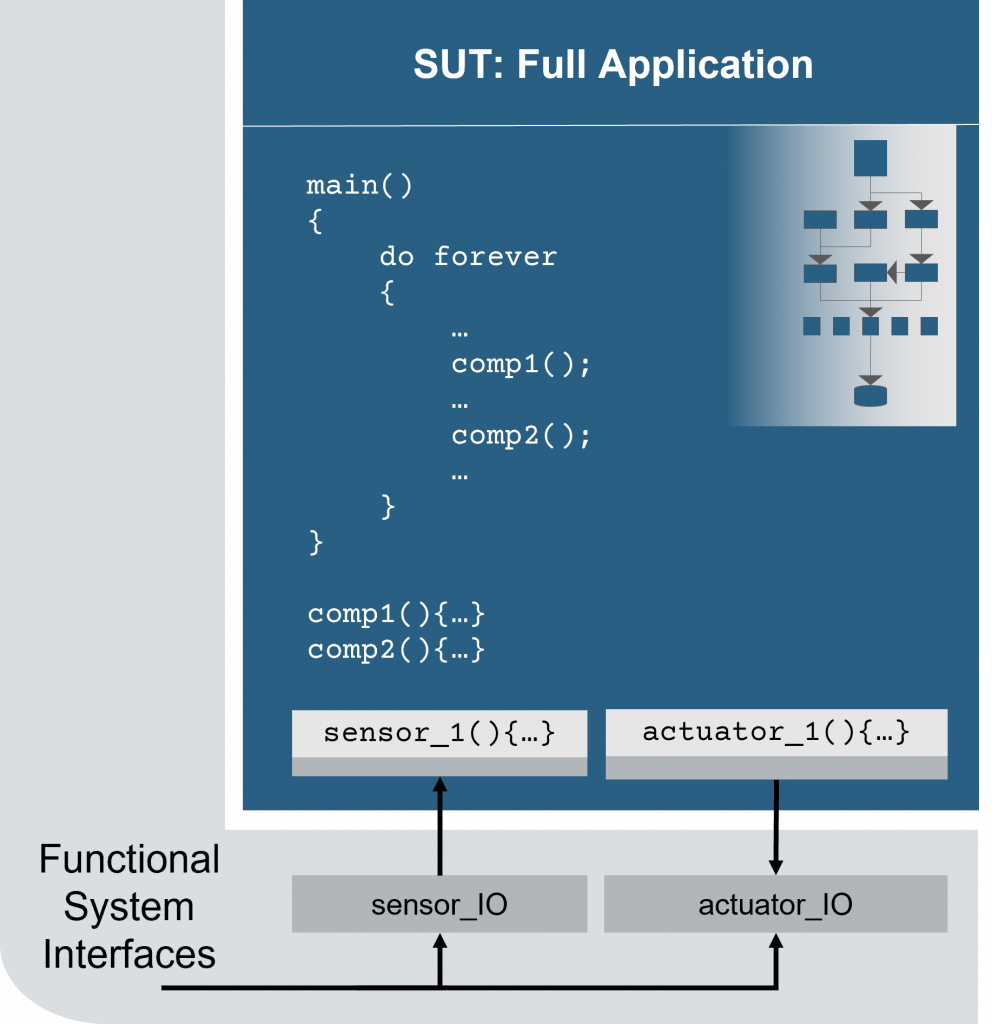
Let’s now move on to the hardware of your embedded device. The software layer has now already been fully tested, from unit testing to software system testing, and you are sure that the application layer works correctly. What remains to be tested is the software for the hardware layer and the integration of the software into the hardware. Especially the last part might result in additional problems and efforts. One example could be the timing. When we had tested the software on a highly equipped hardware PC (e.g. cores, memory) and then switch to a slower embedded device we could encounter some problems, e.g. in terms of data buffering, which had not been a problem earlier, on the PC. The operating system would also have been different. Hence, a hardware test before delivery is a must.
At this testing level, the communication between the hardware and our environment should be tested. The hardware can be seen as a black box that will be stimulated by the test environment and a specific response is expected. In software system tests conducted earlier we had already written some tests against the abstracted hardware layer which may be reused for the hardware tests (see the hint at testing level 4).
Characteristics:
- SUT runs autonomously, not ‘scheduled’ by test environment
- Tester is the integrator
Goals:
- Test application in a real hardware
- Reuse of test cases
Challenges:
- Communication between HW and test environment
- Test creation is often manual work
Test case executed by test environment:
testcase() {
  set sensor_IO = in1;
  wait(500);
  check actuator_IO == exp1;
}
Functional system interface implemented by test environment:
sensor_1()  { return sensor_IO;   }
actuator_1() { send actuator_IO;   }
More explanation in our video From Unit Test to System Test: 10:43 Hardware System Testing
Testing level 6: Hardware system interoperability testing
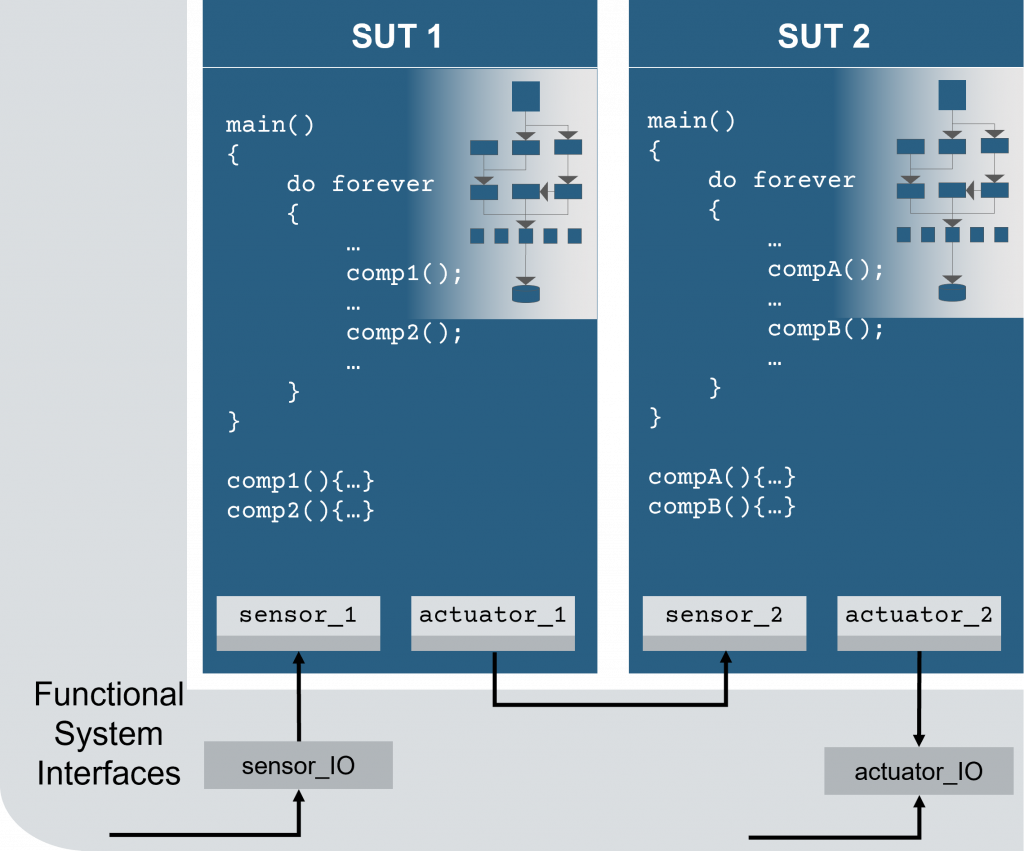
The last test level describes the interoperability of the System-Under-Test with other systems. Here, the test environment stimulates a system, this system interacts with other systems, and the test environment expects certain results from one of the connected systems. In the last test level, each system alone had already been tested, so why test them in combination? Let’s demonstrate this based on a simple example: Suppose two systems are developed independently and tested by different groups. Communication between the two systems had been specified. System one sends the current velocity value to system two. Both systems had been successfully tested alone. When used together, system two does not respond as expected. After a few debugging sessions, it turns out that system one sends the velocity value in kilometers per hour but system two expects this value in miles per hour. Therefore, it is very useful to test the systems together to ensure their interoperability.
Characteristics:
- SUT runs autonomously, not ‘scheduled’ by test environment
- Tester is the integrator
Goals:
- Test communication between SUTs
Challenges:
- Connect SUTs
- Analyze and test communication
Test case executed by test environment:
testcase() {
  set sensor_IO = in1;
  wait(500);
  check actuator_IO == exp1;
}
Functional system interface implemented by the test environment:
sensor_1()  { return sensor_IO;   }
actuator_2() { send actuator_IO;   }
More explanation in our video From Unit Test to System Test: 12:00 System Testing – Communication
Conclusion
Testing your embedded software at different test levels ensures good product quality and saves you a lot of money. The earlier you find bugs, the cheaper it is to fix them. Thus, start testing your software with unit tests and virtualize components or your complete system in early development phases to benefit from early system tests independent of hardware deliveries and easily share new software versions with your colleagues or partners. After you have successfully tested the software in the virtual environment, make sure it works on hardware alone and in combination with other systems.
Video: From Unit test to System test
If you want to get the whole picture right now – watch my video on the whole testing process.
- 01:05 Embedded Systems – The Future is Software
- 02:34 Development Process – Unit, Component, System Tests
- 03:20 Unit Testing
- 05:04 Unit Integration Testing
- 06:32 Component Integration Testing
- 08:57 Software System Testing
- 10:43 Hardware System Testing
- 12:00 System Testing – Communication
- 13:51 Summary: Process Overview
- 15:44 Vector Testing Solutions for all Test Phases


